
You know that bike everyone stands around and admires over and over.... Yep, that's your's all right!
Introducing StreetGlo's Hot Wraps; This is the tank graphics system that gives your motorcycle the testosterone injection it has been missing. These are not cheap vinyl graphics or some solvent ink print job that will wash away in two years. These are made from hand laid cuts of our best Engineer Grade reflective vinyl sheeting and they are made to last, season after season.


This series includes pure- 100% hand laid vinyl layers for a total - vinyl only- graphics system and a hybrid product that combines hand laid vinyl layers with a resin pigment printing technology for those instances where printing is the method of choice for specific graphic designs. While most of the industry has now switched to a ink jet solvent system for vehicle graphics printing, we are sticking with the old and expensive thermal resin system because it is many times more durable than the ink methods and is more resistant to sun fading.


Capture the Magic that says... "CHOPPER".
There is no doubt about it! This is the bike everyone gathers around! This is the bike everyone talks about! This is the bike that many of us want but just didn't know how to get. Well it's simple... All you got to do is order this graphics kit, spend a few hours putting it on and enjoy the instant transformation from ordinary to extraordinary!


YES YOU CAN INSTALL THIS!
ASSURED INSTALLATION EXCHANGE PROGRAM
ASSURED INSTALLATION EXCHANGE PROGRAM
Installation:
Wrapping a motorcycle tank or helmet takes some time, but if you follow the procedure below, your install will be trouble free.
You will receive a left and right version of this decal. Hold them up to the tank to determine what looks best, there is no rule here. Once you have the position, carefully and clearly pull the backing off the HEAD of the decal leaving the flame tips in place on the wax paper. About halfway down where the first inner loops of the flames begin, cut the wax backing with scissors and leave the decal 1/2 on the wax paper and 1/2 exposed. Make sure everything is clean - including your hands. You will be touching the sticky side of the decal but with clean wet hands this is ok.
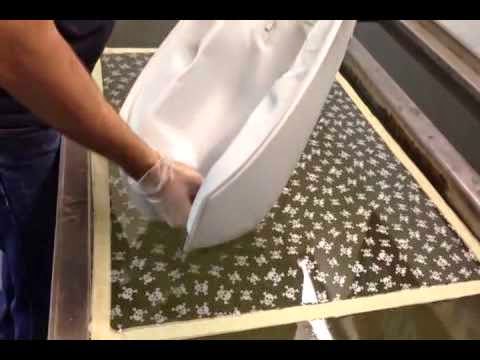


Now use a mix of 1 cup water and 4 to 8 drops of Palmolive liquid dish washing detergent. Use this fluid to keep your decal wet and your tank wet. Spray this all over the sticky side of the decal and the tank. Keep it all wet throughout the installation process or the decal will stick before you are ready. Place the head of the decal in position and starting from the center use your finger to work the decal down and gradually work toward the edges. Keep the decal from bonding by spraying fluid around and under the decal if necessary. You can allow bonding from the center first and only as you see the massage action resulting in the decal bonding flat and bubble free working from the center outwards. What is happening her is the center outward massaging motion is actual stretching the decal to conform it's flat level shape to the rounded surface it is being applied to. It will take a little time to work this decal into place, but do not fear..


We have a :
Continue working the decal down and allow it to bond from the center outwards only and free of bubbles or any kinks in the material. As you keep working the decal from the center point, it will begin to conform and bond to the round tank. After the flame head is applied, you can slowly remove the flame section backing by rolling back the wax paper approximately 2" at a time and working now from the head downward into the flames.


You can pull off the backing completely if you prefer but it's best to have a helper keep the entire area soaking wet with the solvent to prevent flames from sticking to each other as you work the decal.
If you use too much soap in your solution and the decal will not bond, simply spray clear water as your solution and the soapy solution will dilute or even wash away.
Please allow about 1 hour or longer to install both decals.
0 Response to "Hydro Dipping Motorcycle Gas Tank"
Post a Comment